Several members have expressed interest in making crazy quilted fabric postcards, but wondered how to go about creating one. I am far from an expert, but do hope this tutorial is helpful.
Supplies needed:
8 x 10 inch (20 x 25 cm) piece of muslin (for foundation)5 - 7 scraps of fabric
4 x 6 inch (10 x 15 cm) piece of Peltex or Timtex (I used Peltex that is fusible on both sides)
4 x 6 inch (10 x 15 cm) piece of fabric or cardstock for back
rotary cutter, mat and ruler
sewing machine
iron and ironing board
fabric marker or permanent marker to write your message
needles for embroidery and beading needle if adding beads
embellishments: (examples) embroidery floss, pearl cotton, small beads, charms, lace, lace motifs, buttons.
Optional: clear plastic envelope for mailing
Step 1: Piece the front of the block
1. Cut muslin foundation, adding 1.5 to 2 inches (3.8 to 5 cm) to each side. (For a 4 x 6 inch post card, I cut an 8 x 10 inch piece of muslin.) This allows extra fabric so the piece may be used in a hoop for embroidery and allows for any shrinkage the embroidery may cause. Iron the muslin.
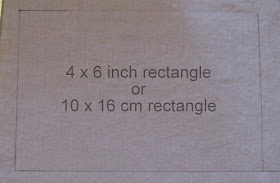
2. Trace a 4 x 6 inch (10 x 15 cm) rectangle on the center of the muslin. This will be the back of the foundation.
3. Piece the crazy quilt block. I used the flip-and-sew method for this tutorial, but you may use the method that works best for you.
3A. Cut a shape for the center of the postcard. (Note: when using a square or rectangle, I have found it easier to piece the block by setting the shape at an angle to avoid vertical and horizontal seams.) Below is my fabric piece #1.
First, place fabric piece #1 face up on front of muslin rectangle. (The rectangle you drew should not be showing. It should be on the back.)
Second, place the 2nd fabric you wish to use face up on the muslin along one edge of fabric piece #1. (Note: if you have shorter edges, like the sides of the photo above, I recommend placing your next fabric next to a longer edge.)
Third, pin fabrics 1 and 2 onto the foundation, as seen above.
Next, sew together along the edge of the red fabric using a 1/4-inch seam allowance.
Iron fabrics so both are right-side-up on the foundation, as seen above.
3C. Using a rotary cutter, ruler and mat, trim the edges of the second fabric.
Place the block on the cutting mat so the right sides of the fabrics are facing down and you are looking at the back of the foundation.
Carefully fold the muslin foundation back away from the area you will be trimming, as seen in the photo above.
Line the ruler up so it follows the edge of fabric piece # 1. Make sure the foundation block is safely tucked beneath the ruler. Then cut along this edge.
 |
| After trimming the right side. |
Following the same steps, flip the block over and trim the other side of the fabric.
 |
| After trimming the left side. |
After both sides have been trimmed, iron the block.
3D. Place your 3rd face down along one of the seams on the block, pin it in place,
trim it
and iron it again as you did in the steps above with your 2nd fabric.
3E. Repeat these steps until your block is fully pieced.
3F. Baste the edges of the pieced block to the foundation.
First, turn the block over. On the muslin side of the block, secure the outer edges of fabrics on the front of the block to the foundation, as seen above.
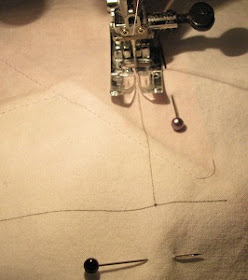
Using the longest stitch setting (to make it easier to remove the stitches later), baste along the 4 x 6 inch (10 x 15 cm) rectangle you drew on the back.
Step 2: Embellish the block.
Tips to keep in mind:
1. Do not stitch beyond the basted line. Any stitching beyond that line will be cut when you create your postcard.
2. Place all beads, buttons or any other bumpy items at least 3/8-inch (0.95 cm) away from the basted seam line. Any embellishments closer to the edge may interfere with sewing the outer edges of the postcard together.
3. Your postcard must not be more than 1/4-inch (0.6 cm) thick in any area.
4. Any beads, buttons or charms should be securely attached. (When sewing beads on, I always pass through each bead 3 times with the thread and then knot the thread in the back 3 times before moving on to the next bead. This way, if one bead is lost, they will not all come loose in the mail.)
5. If you do not intend to use a clear envelope when mailing your postcard, you will want to be sure your embroidery does not include long, loose stitches that can catch in the mail and that your other embellishments will not snag or catch on anything.
Step 3: Assemble the Postcard
1. Remove basting seams from pieced block.
2. Trim embellished block, leaving extra 1/4-inch along each edge you traced.
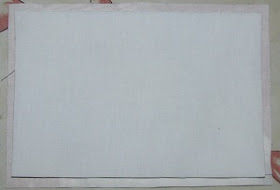
3. Cut a 4 x 6 inch (10 x 15 cm) rectangle of Peltex (or Timtex) and of your backing fabric or cardstock. (Note: If you use cardstock, your needle will dull quickly. Of course, the fusible Peltex or Timtex may do that, too.)
4. Place the embellished block face down on your ironing board. Position the Peltex (or Timtex) within the rectangle you drew. Place the backing fabric on the Peltex. Fuse together according to the directions for your Peltex (or Timtex.)
5. Once fused together, trim the excess fabric.
6. Finish the edges. Some members like to hand stitch the edges with a buttonhole stitch. Others hand stitch lace around the edges, attaching the front to the back. For this postcard, I used a zigag stitch around the edges, following a tutorial I will link to below.
7. Mark the back of the postcard. Then add the mailing address and your message and your postcard will be ready to mail. (I recommend taking your postcard to the post office to mail it out. I have mailed mine in a clear plastic envelope and the post office charges extra to hand cancel the postcard, rather than running it through their machine. And, I must admit, after receiving postcards mailed without an envelope, I have to say I love having the stamp directly on the card. I may have to try mailing mine that way in the future!)
Some of our members prefer to print the fabric for the back of their postcard. I do not have a pattern to print that I can share; however, I did find this tutorial for printing onto fabric.
Tutorials that were recommended to me when I created my fabric postcards are listed below. I am not affiliated with any of these sites.
1. This tutorial from Patchwork Posse that has loads of information. (One option for these postcards is printing photos. Please remember if you do choose to print photos from the Internet, to obtain permission first.)
2. This tutorial at Quilted Delights. (I use the steps from this tutorial to finish the edges of my postcards.)
3. This video tutorial by Rob Appell of Man Sewing. (Due to the embellishments added to CQ fabric postcards, you may wish to skip the batting so you do not exceed 1/4-inch thickness.) Some CQI members commented that they found the finishing information on this tutorial helpful.
As stated earlier, I am not an expert on Crazy Quilted Fabric Postcards. If you have tips or suggestions you believe would be helpful, we would love to hear them. If you find a mistake in the information provided above, please bring it to my attention. Thank you and happy stitching!


excellent tutorial many thanks
ReplyDelete